How to Setup Reactive Cocoa (RAC) for Use in Your iOS App
I am writing an iOS app and I found GitHub’s Reactive Cocoa very helpful.
There isn’t any documentation on the ReactiveCocoa README on how to install it and there are many ways. I tried CocoaPods but it added and changed a whole bunch of stuff. It made me uncomfortable, and I’m the kind of person that likes to know exactly what’s going on, so I decided to do it on my own. I did it the same way the RACiOSDemo project was setup.
Create a Git submodule
Create a folder called external in the project’s root folder. Then, run this to add the submodule:
$ git submodule add https://github.com/ReactiveCocoa/ReactiveCocoa.git external/ReactiveCocoa
$ git add .gitmodules external/ReactiveCocoa
$ git commit -m "Add ReactiveCocoa as a submodule"
If you’re not familiar with submodules, submodules are simply a way of embedding a git repository inside another. If you’re still curious, I recommend reading the Git book’s chapter on submodules.
Now, anytime you clone your repository, you’ll also need to run these two commands to set up the submodule again:
$ git submodule init
$ git submodule update
Setup ReactiveCocoa correctly in your project
Next we need to get the project to appear and build inside our project. In your XCode project, right-click on the Frameworks folder and choose “Add Files to [project]…”. Navigate to external/ReactiveCocoa/ReactiveCocoaFramework and choose ReactiveCocoa.xcodeproj.
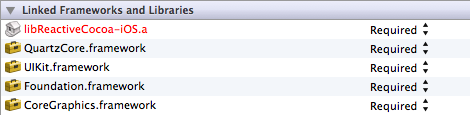
Now we need to setup the our project’s main target to link to the framework. Click on your project in the project explorer. Then, click on your main target and make sure you’re on the Summary tab. Scroll down to the “Linked Frameworks and Libraries” section. Click the plus and add libReactiveCocoa-iOS.a.
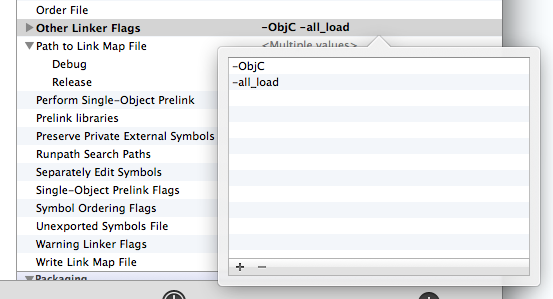
Apparently, for now, we also need to add a linker switch for it to compile the ReactiveCocoa stuff correctly. Go to the Build Settings tab now and scroll down to the “Linking” section. Find the “Other Linker Flags” setting and double-click in the field to the right. Add the -ObjC flag and the -all_load flags.
The last thing we need to do is tell XCode where to look for the framework and header files. Still in the Build Settings tab, scroll down to the “Search Paths” section. Find the “Framework Search Paths” and enter the value, “$(PROJECT_DIR)/external/ReactiveCocoa/ReactiveCocoaFramework”. Then put the same value in for the “Header Search Path”.
That’s it. Now, you can happily use Reactive Cocoa all you want!